PowerPoint
Select a topic below or scroll to view all topics
| Creating a HyperLink in PowerPoint | Making PowerPoint Interactive | Popup PowerPoint | Inserting a Movie | Inserting a Sound |
Creating a Hyperlink in
PowerPoint
1. A Hyperlink can be attached to a picture or to text.
2. First you need to insert the picture or type in the
text that you would like to be your Hyperlink.
3. Make sure that the object you want to link is
highlighted.
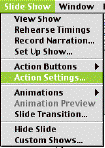
4. Select “Action Settings” from the
“Slide Show” menu.
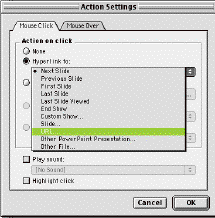
5. Select “Hyperlink to:” and use the pull
down menu to select “URL. . .”
6. Type in the URL address for the site you want to link. You need to include http://

7. When you play your slide show you will be able to click on your hyperlinked object or text and be taken to that site.
A normal PowerPoint presentation moves sequentially through the show.
You can make PowerPoint interactive allowing the user to move to different slides.
1. First create multiple slides to maneuver between.
2. Highlight the button or text that will take you to a different page.
3. Select “Action Settings” from the “Slide Show” menu.
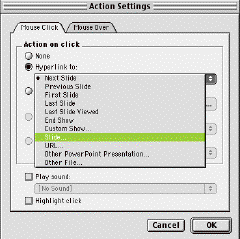
4. Then select “Hyperlink to . .”
5. Use the pull down menu to select “Slide.”
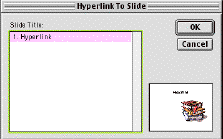
6. Select the slide that you would like to go to from there and click OK.
(When you play your slide show you will be able to move from one slide to the other with these buttons.)
8. Continue to make the buttons to allow the user to move between slides.
Do
not put slide transitions between slides.
This will move the slides sequentially instead of using the action
settings.
1. Design the original word picture on a slide.
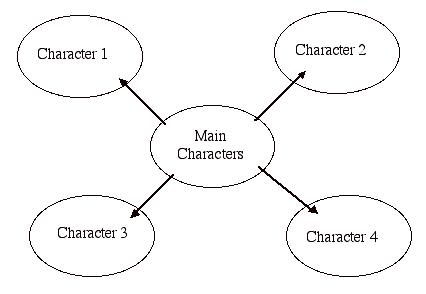
2. If you have text boxes within shapes, you will have to group them together.
· To do this select the text box and shape both by holding down the shift key.
· Then go to the Draw menu located on the side of your screen and select “Group.”
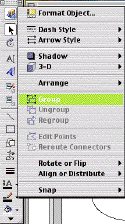
· Do this for each shape on the screen.
3. Copy the first shape and paste onto the screen.
4. Stretch the second shape so that it is large and covers the shape below.
5. Do this for each shape.
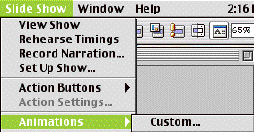
6. Pull down the “Slide Show” menu, pull across the “Animation” menu and select “Custom.”
7. Select the group # for the first large shape.
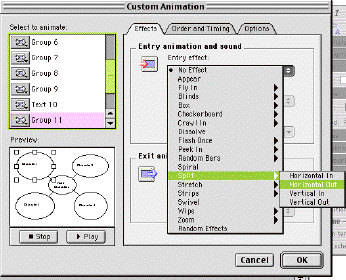
8. On the “Effects” tab you will select a “Split” entry that goes “Horizontal Out.”
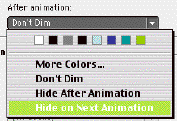
9. Also choose “Hide on Next Animation” for “After animation.”
10. Do this for each shape.
1. Bring the slide up that you want the movie on.
2. Go to the “Insert” menu. Select “Movies and Sound” and “Movie from File.”
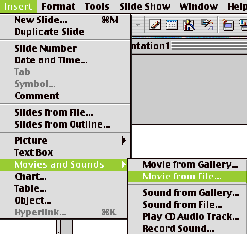
3. Find the movie that you have saved to be inserted.
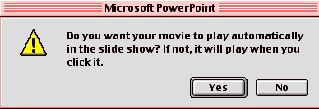
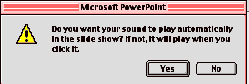
4. It will ask you if you want it to play automatically when you play that slide.
5. You may go to the “Slide Show” menu and select “Animations”, “Custom” to change how your movie plays in the slide.
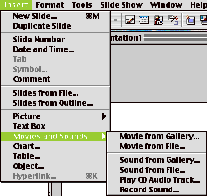
1. Go to the “Insert” menu and select “Movies and Sound.”
2. You may choose a sound from Microsoft’s files, a sound that you have downloaded, or have a CD playing in the background.
3. If you select a CD, then this box will appear and it will have you select the tracks you want to play and how much of that track you want to play.
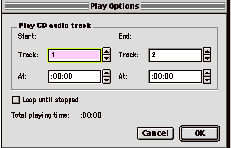
You can also have it loop until stopped if you want it to continue to play throughout the slideshow.
The CD will have to be in the machine while playing the slide show.
4. It will ask you if you want the CD to start automatically or if you want to start it.
5. You may go to the “Slide Show” menu and select “Animations” ,“Custom” to change how your CD plays in the slide.